***To make an order or purchase items email us at: craftysenoritas@gmail.com and we will send an invoice via PayPal. Don't have a PayPal account? No worries we accept credit/debit cards as well. ***
**To "pin" a post, click on the title of the post you want to pin, then click the pin it button**

Thursday, April 26, 2012

Felt Hair Clip Tutorials

Ok, so I was going thru my craft supplies the other day 'trying' to organized stuff and I realized I have a boat load of felt not the nice wool felt but the cheap polyester stuff. From a bunch of different projects. I was getting bored with my little girl's bows. She wears the same ones all the time. So I made some boutique bows and a lace flower. And since I have a mound of felt I figured I would look up some cute felt clip ideas. I found some great tutorials here and here. I learned you should use the wool felt but being cheap and not wanting to go buy more and add to the pile I used what I had.
Mound of Felt
 Lace Flower Tutorial
Supplies:
2 feet of 4 inch lace
Needle and Thread
Button, Jewel or some kind of embellishment for the center
Clip for the back
Glue
 First I cut my 4 inch wide lace into 3 inch strips, end up with 8 pieces,
 Then I pushed the needle up and down as I went thru the lace, top to bottom,
 Pull tight and tie of the end of the thread, repeat for all 8 pieces,
 Once you have all 8 done, fold them in half where you cinch the center, and put them all together facing the same way, (hope this makes sense)
 When they are all together they should look like this...

 Then take your needle and thread again and sew the ends together,
 Pull tight and tie off,
 When you flip it over it should look like this...
 Find the center and add your embellishment,
 Turn it back over and add you clip,

All done!!
 Felt Flower Tutorials
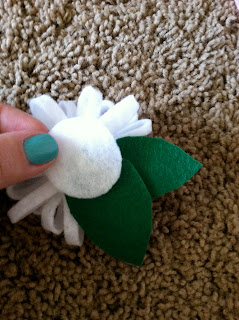
So I basically followed the tutorials I found, so this isn't my own idea. They go into way more detail so check them out here and here. Their blogs rock by the way. This is what I did...
Cut a circle of felt, then cut it into a wavy spiral, (the waves create petals) leave a little circle at the center,
 Take the smallest end and start to roll it,

 Continue to roll it until you get to the end, glue the end to the back, (be sure to goop on enough because this is what will keep your spiral together)

 For leaves, cut a shape like this....
 Then glue it to the back, add clip and your done!!
 For the next one,
Cut a strip of felt narrow and long, I don't know what length I did sorry, just eye ball it, (the wider it is the bigger it will be, and the longer it is the fuller it will be)
 Then glue or sew the two long edges together, (I tried both and either works fine, sewing took a little longer but the glue made it a little bulkier)

 Folded in half
 Now cut narrow strips, cutting from the folded part to the glued part, DO NOT CUT ALL THE WAY  THRU!! This is where the glue comes in handy, it keeps you from cutting is all the way, make sure to cut fairly close to the edge but not too close,

 Once the whole thing is cut, start rolling it together, 


Once the whole thing is rolled you can sew or glue the bottom together. I prefer to sew the glue was messy and added too much bulk, but either works fine, 


 Pull tight and tie off,
 Cut a small circle to cover the bottom,
 And leaves if you want, glue or sew the leaves in place, I used glue, then the circle to hide everything and hold in place,
 Add a clip then all done!!
 Cut five circles the same sized, (I cut my fifth circle too small as you will see in the bottom pictures, it works best if they are all the same size)
 Fold your circle in half twice, then sew the tip so it stays that way,
 Do this to four of the circles, then take the fifth circle and sew the 4 folded circles on top, (it doesn't matter which way they face)
 Once all four circles are on fluff them up so they cover the center, add leaves and a clip then you are done!!
 Then using all these flowers I made them smaller and glued them together!! The possibilities are endless! I love that this project didn't cost my anything because I used what I had on hand. Love it when I can complete a project without spending a penny.

If you make any of these, send us a picture!! We'd love to see your creations
CraftySenoritas@gmail.com

Pin It

Wednesday, April 4, 2012

Now on Facebook

We are now on Facebook!! Follow us and 'like' us at www.facebook.com/CraftySenoritas!!

How'd You Do That: Laundry Soap

So I learned a while ago that you can make your own laundry soap. WHAT?! Yup that's right. And it's super duper easy. No seriously it is! So I started to research it a bit. Their are recipes ALL over pinterest and blogland. So I talked to some friends about it and one of them has been making it already to save some money. Really? How much money can you really be saving? I mean is it really worth it? OH MY GOSH YES!!! The recipe she used was the one from the family that has nineteen kids, I think they are the Duggar family. Anyway, I cut it in half because their recipe made TEN GALLONS!! So I cut it in half and made only five. It turned out really watery. It washed my clothes great, just like regular soap, but I wasn't to happy about the wateriness (is that even a word) of it and the fact that I had to use a five gallon bucket to mix it. So I tried a new recipe that I found here via pinterest and I like the texture of this batch way better and that I just put it in my bottles and shake it to mix it up. She has way more detailed instructions so go check her out.

So, in short, here's what you need:
1 bar of soap ( I love Fels-Naptha!! I love the smell and the fact that it's laundry soap)
1 cup borax
1 cup washing soda (not baking soda)
Grate up your bar of soap. Then melt it down on the stove top in about 8 cups of water. Stir until all the pieces are melted (don't let it boil, it will foam). Add Borax and Washing Soda. Stir until dissolved, then remove from heat. Evenly distribute into 3 to 4 containers. (I used old juice containers that I washed out, I wouldn't use milk jugs because the heat from the water makes them warp) Then add hot water, around 4 cups to each container. Give each container a good shake, Then let cool. It will harden a little into jelly like substance. As its cooling you can give the containers a shake every now and then to keep it broken up a bit but it isn't needed. Once cooled, evenly add hot water to each container until full. Leave a bit of space so that you can shake to mix one last time. Cap 'em and store 'em. I use about 1/4 cup with each load. As they sit, they will separate so you will need to give them a shake each time you use it.


That's it! Pretty simple huh? Now the break down in cost. I got all the supplies at my local walmart.
Soap 97 cents
Big Box of Borax was 3 buck and some change
Big Box of Washing Soda was 3 bucks and some change.
So with taxes about 10 bucks for making 3 - 4 gallons of laundry soap!! And since you only use a little of the Borax and Washing Soda it only cost a dollar the next time you make it!!
So worth the savings to me!!
Pin It

Birthday Hat Hair Clips!!!!

**UPDATE: HERE**

Does your darling daughter have a birthday coming up? Do you have the perfect outfit all picked out and ready to go? Well we have the perfect accessory to top off that birthday outfit that you have put so much time into planning and preparing. Mini Birthday Hats!! Aren't they just absolutely darling!!

I got the idea when we went to Disneyland. They had mini Mad Hatter Hats that were so cute. They weren't as mini as these are but that's what sparked the idea. I love birthday hats. I think they are just so fun. But with most little ones they don't tolerate the elastic ties or ribbons under their chins. So you only get them to wear them long enough to take their picture and off they come. If I was going to go thru all that trouble to make my daughter her birthday outfit I wanted something that she could wear all day that said, "it's my birthday!!" Bows are great for everyday wear, but I wanted something for that one special day a year. These Mini Birthday Hat Clips are perfect. You can clip them directly in their hair or clip them onto a headband of your choice! They are about the size of a hair bow, just the right size for all day wear. These are also great for ANY age.


Order your Mini Birthday Hat Clip today! Here's how you do it.
Email us at craftysenoritas@gmail.com
Send us a picture of your birthday outfit or tell us the colors and any specifications you would like
We will create your Mini Birthday Hat Clip and send you a picture
If it is to your liking we will send you an invoice via PayPal
You can pay with your credit card or your PayPal account
Once the payment is received your Mini Birthday Hair Clip will be on it's way!! (Also available for local pick up)

Price: $10 for Custom Mini Birthday Hat Clip
+ shipping 5.50
or
FREE for local pick up


Pin It


Shared Love