Ok, so I was going thru my craft supplies the other day 'trying' to organized stuff and I realized I have a boat load of felt not the nice wool felt but the cheap polyester stuff. From a bunch of different projects. I was getting bored with my little girl's bows. She wears the same ones all the time. So I made some boutique bows and a lace flower. And since I have a mound of felt I figured I would look up some cute felt clip ideas. I found some great tutorials here and here. I learned you should use the wool felt but being cheap and not wanting to go buy more and add to the pile I used what I had.
Mound of Felt
Lace Flower Tutorial
Supplies:
2 feet of 4 inch lace
Needle and Thread
Button, Jewel or some kind of embellishment for the center
Clip for the back
Glue
First I cut my 4 inch wide lace into 3 inch strips, end up with 8 pieces,
Then I pushed the needle up and down as I went thru the lace, top to bottom,
Pull tight and tie of the end of the thread, repeat for all 8 pieces,
Once you have all 8 done, fold them in half where you cinch the center, and put them all together facing the same way, (hope this makes sense)
When they are all together they should look like this...
Then take your needle and thread again and sew the ends together,
Pull tight and tie off,
When you flip it over it should look like this...
Find the center and add your embellishment,
Turn it back over and add you clip,
All done!!
Felt Flower Tutorials
So I basically followed the tutorials I found, so this isn't my own idea. They go into way more detail so check them out here and here. Their blogs rock by the way. This is what I did...
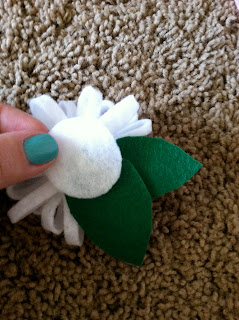
Cut a circle of felt, then cut it into a wavy spiral, (the waves create petals) leave a little circle at the center,
Take the smallest end and start to roll it,
Continue to roll it until you get to the end, glue the end to the back, (be sure to goop on enough because this is what will keep your spiral together)
For leaves, cut a shape like this....
Then glue it to the back, add clip and your done!!
For the next one,
Cut a strip of felt narrow and long, I don't know what length I did sorry, just eye ball it, (the wider it is the bigger it will be, and the longer it is the fuller it will be)
Then glue or sew the two long edges together, (I tried both and either works fine, sewing took a little longer but the glue made it a little bulkier)
Folded in half
Now cut narrow strips, cutting from the folded part to the glued part, DO NOT CUT ALL THE WAY THRU!! This is where the glue comes in handy, it keeps you from cutting is all the way, make sure to cut fairly close to the edge but not too close,
Once the whole thing is cut, start rolling it together,
Once the whole thing is rolled you can sew or glue the bottom together. I prefer to sew the glue was messy and added too much bulk, but either works fine,
Pull tight and tie off,
Cut a small circle to cover the bottom,
And leaves if you want, glue or sew the leaves in place, I used glue, then the circle to hide everything and hold in place,
Add a clip then all done!!
Cut five circles the same sized, (I cut my fifth circle too small as you will see in the bottom pictures, it works best if they are all the same size)
Fold your circle in half twice, then sew the tip so it stays that way,
Do this to four of the circles, then take the fifth circle and sew the 4 folded circles on top, (it doesn't matter which way they face)
Once all four circles are on fluff them up so they cover the center, add leaves and a clip then you are done!!
Then using all these flowers I made them smaller and glued them together!! The possibilities are endless! I love that this project didn't cost my anything because I used what I had on hand. Love it when I can complete a project without spending a penny.
If you make any of these, send us a picture!! We'd love to see your creations
CraftySenoritas@gmail.com


These are adorable, thank you for posting how you made them!
ReplyDelete