***To make an order or purchase items email us at: craftysenoritas@gmail.com and we will send an invoice via PayPal. Don't have a PayPal account? No worries we accept credit/debit cards as well. ***
**To "pin" a post, click on the title of the post you want to pin, then click the pin it button**

Tuesday, December 11, 2012

Back to the grind

Finally the boutiques are done!! I'm sad but glad that it's done. Boutiques are definitely hard work, but super fun too. I've met some really cool people over the last couple months. The boutiques were great and there were a lot of awesome vendors at each with extremely cool stuff. If you missed out I'm so sorry cause it was definitely amazing.

So now that the boutiques are done, time to get back on track. I love this time of year. Halloween is always the starter of the holidays. We always have a blast at a bunch of parties and make a bunch of different crafts from Halloween to Christmas. Things are so busy it seems we are always running somewhere for something. Getting to see family and friends we haven't seen in a while. Eating amazing food and gaining the lovely winter weight. We are avid Halloween enthusiasts, and love a good Turkey Day, but I have to admit my favorite holiday is Christmas. It's such a wonderful holiday focused on love, joy, peace and Christ. I'm so grateful for my beliefs and the blessings I have received. This year has been a tough one but this wonderful holiday is a great way to end the year. 

With that said here are some of my favorite crafts and tutorials for Christmas!!


Merry Christmas y'all!!!

Tuesday, December 4, 2012

TWO Boutiques This Weekend!!!!

If your in the great Mesa, AZ area this weekend, be sure to check TWO great boutiques that are going on. Crafty Senoritas is participating in both. Also there are going to be a ton of great vendors at both. Be sure to check out both there is stuff for everybody!!


Vintage Market
hosted by J's Junktiques
Friday & Saturday
Dec. 7th-8th
8am-4pm
rustic, vintage, shabby chic, antique, christmas and homemade finds that will make your heart skip!!
648 E Lehi Rd
Mesa, Az 85203

The second boutique is a one put on by my local school. The money earn for it by the school goes towards their performing arts department. We have participated in this boutique before and it has a ton great unique stuff! You won't want to miss it!!


Come and Join Us for Our 3rd Annual
Winter wonderland Boutique
Dec 8th
10am-3pm
Highland Elementary
3042 E Adobe, Mesa (east parking lot)
Performances by our very own Band, Orchestra and Show Choir, with some songs from our Little Mermaid Cast
Come get your picture taken with Santa! Beat the crowds at the mall and take a great picture at our very own school
Get your holiday shopping done! Lots of good treats to get like, marshmallow guns, hair bow, jewelry, knitted hats, Hair rinse, Duct Tape wallets, Tutus, Homemade original crafts, and so much more!
Silent Auctions - Help raise money for the performing arts and bid at our silent auction with donations from our crafters and artists
Lunch available by - Allison's Texas BBQ


Hope to see you there!!

Monday, November 5, 2012

Fall boutique and bake sale!! November 17th

Hey did you miss the boutique?! That's ok we will be at another one. November 17th at 1250 E 1st place Mesa 85203 from 9:30am-2pm!! Mark your Calendars and spread the word. Lots of cute stuff, shabby chic furniture, hair clips, baked goods, jewelry, home decor and lots more!! Hope to see you there!

Friday, October 5, 2012

No Way!!

Sorry we have been missing here at Crafty Senoritas. We apparently caught the bug. The pregnancy bug. Go figure. So since boutique season is right around the corner and we have been not feeling so hot, we have been putting most of our extra effort towards prepping for the boutiques. We have two official dates that we would like to share with you and as we get more details we will share. 

November 3rd is one from 9am - 2pm 
 and
December 1st is another from 9am - 2pm as well.

Once we get some more details we will post. Most of the info will be posted on facebook so make sure to check us out at http://www.facebook.com/CraftySenoritas.

Hopefully we can get to feeling better soon and be back on track with some fun projects we've been doing. 

Happy October!!!!!

Monday, August 13, 2012

Homemaking Guide//Part One: Schedules-Daily

If you are just reading this series start here at the begining.

Figuring out a daily schedule has been probably the hardest part so far for me because I'm not one to stick to schedules. I like the freedom of just going with the flow. See how the day goes. Well that hasn't really been working in my favor so it's time for some structure. So after hours and weeks of research and trying things out this is what my schedule will look like for now.

6:30am ~ Wake up & Exercise
7am ~ Shower & Get ready for the day
7:30am ~ Make Breakfast & Wake kids up if not already
8am ~ Dress kids & Morning chores
9:30am ~ Run errands (if any) or Kids outside activities
11:30am ~ Lunch time
12pm ~ Nap/Quiet time & Mom's free time
2pm ~ Structured play time/learning time
4pm ~ Start dinner & Kids Electronic time (tv, ipad, games)
5-5:30pm ~ Eat Dinner
6pm ~ Clear table & Family Scripture Study
7pm ~ Bath/Bedtime routines for kids
7:30pm ~ Kids in bed & Nightly Chores
8:30pm ~ Adults free time
10:30pm ~ Light out!

Now... I am not a morning person at all. I hate waking up early. But I know how important it is to get up in the morning and get moving. My daughter has always been a morning person and has been my alarm clock. But as of recently she has been sleeping in or just playing quietly in her crib. So as a result I have been back in the routine of sleeping in late. If I don't get moving first thing in the morning I tend to drag my feet all day. Then as a result I don't get anything done. Early morning is when I get the most done. But actually forcing myself to get up has definitely been a challenge. If you aren't a morning person don't worry about forcing yourself to do something you know you aren't going to do. I'm not a morning person, but I know myself, and that if I don't force myself to get up then my day is not a productive one. I have been exercising lately out of the home and just recently started doing some stuff in the mornings. I like this because it gets me motivated for the rest of the day. I don't do hard core working up a sweat exercising. Just something like pilates or yoga for about 20-30 minutes. This also doesn't happen everyday either. Some mornings I just can't motivate myself to do it. My kids hear me in the morning so they wake up on there own. After the kids are fed and dressed in the morning, this is when I like to run my errands. Morning is the best time for me to go out and get things accomplished because if I wait, it doesn't seem to get done. I hate taking my kids on my errands with me because we are a circus, but I know if I wait until later in the day it doesn't get done because something comes up. My kids are 2 and 4, and from the day the were both were put on a napping schedule. Yes, my 4 year old still naps... most days. Some days I can tell it would be better for him not to have a nap, but for the most part he still needs a nap. If he is on a no-nap-day he has quiet free play in his room. That way I still get my quiet time. After naps I have started doing structured play time with my kids. This is my time to play with them and teach them at the same time. The most important thing to me during this time is to give them my undivided attention. After our playtime together it's time for me to start dinner. So to distract them, this is when they get to watch t.v. or play with electronics. They get to choose what they want to play with. Once I'm done making dinner we set the table and eat together as a family. After everyone is done eating we clear the table and have our family scripture study. With toddlers, our scripture study last about a second but we want to get in the habit of doing it. After, we have dessert if there is any for that night. Close to bed time we start their nightly routines of chores, baths, pjs and reading. Once the kids are in bed I do my nightly chores then me and my husband have our free time until lights out. This has been working the best for us right now. I know once my oldest starts school a few things will change. Also my days don't always go like this. We schedule in play dates and doctor appointments and things just come up. This is just a guide to help us on those days where there isn't anything planned. This has helped add a little structure to my otherwise crazy days.
I made an excel spread sheet with this schedule on it and put it behind my daily chore chart in my HMG.

Pin It

Monday, July 23, 2012

Homemaking Guide//Part One: Schedules-Cleaning


So Heather's first section she has in her HMG in her bible study section. I study the scriptures as well but I have a separate journal for that. So I will skip that section. The second section in her HMG is Work Schedules. She breaks it down into Daily Tasks, Weekly Work Schedules, A Breakdown of her daily Schedule for the School Year and the Summer. I will be putting my Cleaning Schedule, Weekly Schedule, and my Kids Daily Schedule in this section. These Schedules will change every now and then but if I have a copy of it, when it does need a change I won't have to start from scratch again. These schedules take a long time to complete. For mine I did a lot of research of what other people do and customized them to my needs. A lot of people do laundry once a day. I used to do it once a week because I hated the idea of laundry EVERY DAY. And that worked out fine when I only had one kid. But now that our family is growing if I only did laundry once a week it would get over whelming and literally take the whole day to wash/dry/fold/put away my laundry. So I tried switching to one type of laundry a day and that as been so much easier. Then I scoured pinterest and found some other cool ideas. Like this one that had a 'swing' day for working in the monthly tasks. And this one that broke up the weekly cleaning. This works great for me. I'm not very fast at cleaning and so I was trying to have Saturday be my day for the weekly chores, but something always seemed to be going on. So I would only get about half way done. So now each day something gets done and I don't have to worry about it till the next week. So After all my research and knowing myself I have finally compiled a daily cleaning schedule for myself. My daily chores seem like a lot but they are simple and fast. I don't spend a lot of time doing all of them.
Morning Chores-
make bed, wipe down bathroom counters, empty dishwasher, load of laundry, get mail, chore of the day
Nightly Chores-
load dishwasher, wipe down kitchen counters, take out trash, quick sweep/vacuum, spot clean floor, de-clutter living areas
I try to do this everyday. These aren't deep cleaning chores. Just things to keep the house tidy.
Weekly Chores//Chore of the Day-
Monday-
I dust and vacuum the whole house. Again I don't do a deep clean I just do a quick dust and vacuum in each room to all the surface areas. I don't move the furniture, I just quickly go around each room.
Tuesday-
I clean all the mirrors and windows. I even clean the one's I have up for decorations. This one is easy because I don't have a lot of mirrors. And for the windows I only clean the inside not the outside. I leave that for my Saturday yard work.
Wednesday-
This is the day I give the bathrooms a good cleaning. I clean the showers, tubs, toilets and sinks. I only have two bathrooms and they are small so this goes pretty fast as well. Don't forget to clean the bottom of the toilet and the wall behind it (especially if you have little boys)
Thursday-
This is when I mop all the floors. I love doing this before the weekend because then my floors are all clean for company on the weekends. I have a ton of tile so this usually takes me a bit longer. Don't forget to seal your grout every couple years to keep it from looking grungy. I found an amazing recipe for cleaning grout here.
Friday-
This is my 'swing' day. This is when I DEEP cleaning things. My monthly cleaning is broken up throughout the month so that I don't have to worry about one big monthly cleaning day. And I don't have to spend the entire day doing it. This is when I move furniture and vacuum underneath, clean my appliances, baseboards, doors and walls. These tasks take a little extra time but I have noticed that I'm getting faster at it because things are staying cleaner during the week.
Saturday-
This is when I do all my outside chores like, wash the outside of the windows, clean off the patio, pull weeds, clean up garage and shed, check the sprinklers for any problems. The kids love playing outside and get to help with some of the stuff too.
Sunday is my day of rest

My laundry is broken up into days as well. Monday thru Wednesday is when I do mine and my husbands laundry. Thursday and Friday are the kids laundry days. Saturday is when I wash all my towels and bedding that needs to be cleaned.

I created a layout on my computer and found a frame in my stock pile and found some cute scrapbook paper in my other stock pile. I hung it up in the hall with the kids chore charts. As I do each chore I mark it off with a dry erase marker. I didn't want the kids to have glass frames so I used sheet protectors and a clip board. They love getting to mark off the chores they complete. If you would like to make some of your own I found a cute free template here on pinterest. I love my new chore boards because they help keep all of us motivated to keep the house clean. I'll eventually make the wall cuter and decorate it better, but for now it is functional and being used and that's all that matters.


Pin It

Tuesday, July 17, 2012

Homemaking Guide Project

So I have been trying to find a cleaning schedule that works well for me. I have the hardest time staying on top of my home management. I stumbled across this amazing site the other day. She has this binder called 'The Home Management Guide' and I absolutely love it. She says that she is the manager of their home and that this guide helps her keep her home 'managed.' Everything is broken down into sections. I won't be using all the sections in it, and some of my sections will be used differently, but I absolutely need to give this awesome lady credit. I already have an organized binder for my meal planning and recipes and it works great for me and helps aid me in my meal planning. So why I didn't think of a HM binder sooner is beyond me. It has great lists and ideas. I've incorporated chore charts into my children's schedules and they have been successful. I've just haven't found something that worked for me. I'm so excited about doing this binder. I'm so glad that she created this and shared it. She encourages us not to do it ALL in one sitting. And so I'm going to take her advice. I will create one section at a time and share with you what I have come up with. Also, just because this works for me doesn't mean it will work for everyone. Her HMG and mine will be different because we are different people and we have different homes. Find something that works for you. Try different things and if it doesn't work out try something different. Find out what works with your personality and home. Again this was not my idea, I'm am just sharing what my HMG contains. The 'original' creator can be found here. Also check out the rest of her site for more great ideas on budgeting, organization and more. I don't consider myself a 'manager' so to accommodate myself and my personality I will call my guide the 'Homemaking Guide.' I hope you guys can gain some inspiration from this project. Make sure you check out Heather's site, since she is the 'original' creator of this guide, for some more awesome ideas on how to manage your home.


Pin It

Tuesday, July 3, 2012

Little Girl Dress Slip

So I have been looking for a little girl dress slip tutorial for like forever. I didn't have much luck. Not that many people where slips anymore I guess. But here's the thing I had sewing ruffles. They take forever. Recently I learned that you can buy a ruffler foot. But those are pretty pricey. I did some research and found out how to make a ruffle without one and I thought I would share.

First make your stitch length as long as you can
Then make the thread tension as high as it goes
Guide your fabric with one hand
Then rest your other hand on the top of your machine where the thread starts to go in
Be sure not to hold too tight, just a little pressure with your hand
Then as you sew, your fabric will start to gather
Perfectly gathered and I didn't even have to pull any strings
You might have to adjust the gathers a bit to fit correctly
To Make the slip 
I cut the bottom of a onesie off
Measure the the width of the onesie all the way around and double it for the length of the first ruffle
Then for the second ruffle double the length of the first ruffle
I just used cotton fabric and it does quite poof right So I added a ruffled tulle edge on the bottom to give it a bit more poof to it. 
To gather the tulle I sewed down the center of it using the sam technique
Ta Dah!
Perfect slip for under your little girls dresses to give them that little extra umpf!

Pin It

Tuesday, June 5, 2012

Ruffle Skirts


Adorable spring ruffle skirts available. These versatile skirts are all handmade and are machine washable with an elastic waist so there is room for growing.  These unique, one-of-a-kind skirts are fun and colorful perfect for your baby girl or a great baby shower gift.
Each skirt is $9 
+ shipping to any state in the US.
Each skirt is one-of-a-kind so only one of each are available for order. They are all done and ready to be shipped so you can receive them quickly
To purchase email us at craftysenoritas@gmail.com.

Peachy Rose
Size 0-3 months
Baby Duck
Size 0-3 months
Purple Petal
Size 0-6 months
Shady Pink-SOLD
Size 0-6 months
Blushing Zebra-SOLD
Size 0-6 months
Blushing Cherry
Size 6-12 months
Misty Zebra
Size 6-12 months
Purple Twist
Size 12-18 months
Amber Blossom
Size 6-12 months

Retro Dot
Size 12-18 months


Pin It

Monday, June 4, 2012

Coming Soon!!

Pin It
We've been working like crazy ladies lately getting some new stuff in the works. A few things to look out for soon... Crocheted baby booties Wrap cap Changing pad clutch Ruffle skirts Lil apron sets And more... Come back soon!

Saturday, June 2, 2012

Birthday Hat Clips For Sale


We've been working on some Birthday Hat Clips for a custom order. Once we made one we just couldn't stop. Here a few that are available and ready to ship. 
 SOLD
Glimmer
Measures about 2.5 inches tall
(light purple with yellow tulle and pink rhinestones topped with a sparkle puff)
Vintage Ballerina
Measures about 4 inches tall
Made larger for older girls
(light pink with small roses, yellow and pink ruffled ribbon, light purple tulle, topped with a white cotton puff)
Little Lacey 
Measures about 2.5 inches tall
(light pink with small roses, yellow and pink ruffled ribbon, cream vintage lace, topped with a white cotton puff)
Vintage Ballerina and Little Lacey can be sold as a set. 

These hats are done and ready to be shipped. Custom orders are always available but we need sufficient time to make them and ship them in time for your occasion. Come back soon as we have a few more that will be done soon. Also to come soon is our spring ruffle skirts.


Pin It

Friday, May 18, 2012

Dollar Store Crafts

 Here's the loot I got from the dollar store to aide me in my next few crafts. I got all my ideas via pinterest. There are some amazing people in blog land and thanks to pinterest I can easily find their great ideas and share them. 
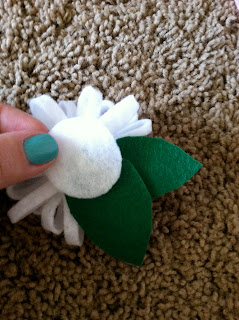
For the first project I made a pom pomander out of cupcake liners. I got the idea here at Kara's Party Ideas. I love this site!! Go there and check it out right now. I'll wait. She has every party idea you can think of.
Awesome right?! 
Ok so she used pins and being as I'm cheap and don't want to use my precious pins, I just hot glued them to the styrofoam ball. And since it was the dollar store there cupcake liner options were limited. As in they only had white. So First I held the center of the liner and squished it.... See...? Ok if you don't refer back to Kara's awesome tutorial here. You will also notice that she used several liners with one pin. I only used one at a time.
 Since I didn't want to use the pin I needed to do only one liner at a time and I bent the tip to glue it to the ball. Use the lower setting on your glue gun so you won't burn a hole thru the ball, just sayin'. 
Then fluff the liner to spread it out a little. 
Continue to glue the liners fairly close, so the styrofoam doesn't show thru. 
 Leave a gap at the bottom so that is will sit on the candle stick holder.
I got mine at the dollar store, nothing fancy but it works.
 Ta Da!!!!
Ain't she purdy?!
Super simple right?
I did the same thing with coffee filters to make a bigger one. But I didn't leave a hole I filled the whole thing to make a big flower lookin' poof. Turned out super cute. I'll show you in the room's reveal. 

Total for the project:
$2.25!!

Package of cupcake liners $1
Glass Candle Stick Holder $1
Bag of 4 Styrofoam balls $1 (use one ball .25 each)

If you do this project send us some pictures, we would love to see your twist on it!!
craftysenoritas@gmail.com

Pin It

Wednesday, May 16, 2012

Sneak Peek


I have been working on my daughter's room for... well forever. My brain has just been overloaded with so many ideas and I've been trying to condense it all. I'm am so close to being done. Funds were super limited with this room so I spent a lot of time searching pinterest for ideas on cheap diy crafts to make my vision come to life. We will have some tutorials on how I did some of these crafts and where I got the ideas. So come back soon for the big reveal and some fun tutorials on cheap decor crafts.

Pin It

Thursday, April 26, 2012

Felt Hair Clip Tutorials

Ok, so I was going thru my craft supplies the other day 'trying' to organized stuff and I realized I have a boat load of felt not the nice wool felt but the cheap polyester stuff. From a bunch of different projects. I was getting bored with my little girl's bows. She wears the same ones all the time. So I made some boutique bows and a lace flower. And since I have a mound of felt I figured I would look up some cute felt clip ideas. I found some great tutorials here and here. I learned you should use the wool felt but being cheap and not wanting to go buy more and add to the pile I used what I had.
Mound of Felt
 Lace Flower Tutorial
Supplies:
2 feet of 4 inch lace
Needle and Thread
Button, Jewel or some kind of embellishment for the center
Clip for the back
Glue
 First I cut my 4 inch wide lace into 3 inch strips, end up with 8 pieces,
 Then I pushed the needle up and down as I went thru the lace, top to bottom,
 Pull tight and tie of the end of the thread, repeat for all 8 pieces,
 Once you have all 8 done, fold them in half where you cinch the center, and put them all together facing the same way, (hope this makes sense)
 When they are all together they should look like this...

 Then take your needle and thread again and sew the ends together,
 Pull tight and tie off,
 When you flip it over it should look like this...
 Find the center and add your embellishment,
 Turn it back over and add you clip,

All done!!
 Felt Flower Tutorials
So I basically followed the tutorials I found, so this isn't my own idea. They go into way more detail so check them out here and here. Their blogs rock by the way. This is what I did...
Cut a circle of felt, then cut it into a wavy spiral, (the waves create petals) leave a little circle at the center,
 Take the smallest end and start to roll it,

 Continue to roll it until you get to the end, glue the end to the back, (be sure to goop on enough because this is what will keep your spiral together)

 For leaves, cut a shape like this....
 Then glue it to the back, add clip and your done!!
 For the next one,
Cut a strip of felt narrow and long, I don't know what length I did sorry, just eye ball it, (the wider it is the bigger it will be, and the longer it is the fuller it will be)
 Then glue or sew the two long edges together, (I tried both and either works fine, sewing took a little longer but the glue made it a little bulkier)

 Folded in half
 Now cut narrow strips, cutting from the folded part to the glued part, DO NOT CUT ALL THE WAY  THRU!! This is where the glue comes in handy, it keeps you from cutting is all the way, make sure to cut fairly close to the edge but not too close,

 Once the whole thing is cut, start rolling it together, 


Once the whole thing is rolled you can sew or glue the bottom together. I prefer to sew the glue was messy and added too much bulk, but either works fine, 


 Pull tight and tie off,
 Cut a small circle to cover the bottom,
 And leaves if you want, glue or sew the leaves in place, I used glue, then the circle to hide everything and hold in place,
 Add a clip then all done!!
 Cut five circles the same sized, (I cut my fifth circle too small as you will see in the bottom pictures, it works best if they are all the same size)
 Fold your circle in half twice, then sew the tip so it stays that way,
 Do this to four of the circles, then take the fifth circle and sew the 4 folded circles on top, (it doesn't matter which way they face)
 Once all four circles are on fluff them up so they cover the center, add leaves and a clip then you are done!!
 Then using all these flowers I made them smaller and glued them together!! The possibilities are endless! I love that this project didn't cost my anything because I used what I had on hand. Love it when I can complete a project without spending a penny.

If you make any of these, send us a picture!! We'd love to see your creations
CraftySenoritas@gmail.com

Pin It

Shared Love